Tesla Model Y: Charge Settings
Access charge settings by touching Controls > Charging when Model Y is in Park.
You can also touch the battery icon on the touchscreen to access charge settings.

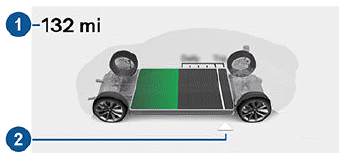
1. Driving distance: Displays the total estimated driving distance available.
2. Set limit: Adjust the charge limit by dragging the arrow below the battery to indicate the level of charging you want. The setting you choose applies to immediate and scheduled charging sessions.
NOTE: If your vehicle is equipped with an LFP Battery, which you can determine by navigating to Controls > Software > Additional Vehicle Information, Tesla recommends you keep your charge limit to 100%, even for daily use, and that you also fully charge your vehicle to 100% at least once per week. See Lithium Iron Phosphate Batteries for more information.
NOTE: A portion of the battery image may appear blue. This indicates that a small portion of the energy stored in the battery is not available because the battery is cold. This is normal and no reason for concern. When the battery warms up, the blue portion no longer displays.
You can further adjust charge settings:
- Open Charge Port, Unlock Charge Port and Stop Charging: When not charging, touch Open Charge Port or Unlock Charge Port to open the charge port door or to unlock the charge cable from the charge port. Use Stop Charging when you are finished charging.
- Charge current at this location: The current automatically sets to the maximum current available from the attached charge cable, unless it was previously reduced to a lower level. If needed, touch - or + to change the current (for example, you may want to reduce the current if you are concerned about overloading a domestic wiring circuit shared by other equipment). It is not possible to set the charging current to a level that exceeds the maximum available from the attached charge cable. When you change the current, Model Y remembers the location. If you charge at the same location, you do not need to change it again.
NOTE: If Model Y is charging and detects unexpected fluctuations in input power, the charging current is automatically reduced by 25%. For example, a 40 amp current is reduced to 30 amps. This automatic current reduction increases robustness and safety in situations when an external problem exists (for example, a home wiring system, receptacle, adapter or cord is unable to meet its rated current capacity). As a precaution, when Model Y automatically reduces current, it saves the reduced current at the charging location. Although you can manually increase it, Tesla recommends charging at the lower current until the underlying problem is resolved and the charging location can provide consistent power.
- Schedule: Depending on the setting you select by touching Switch to Scheduled Departure/Scheduled Charging, this displays either a departure time for when the vehicle should be preconditioned and/or charged by or a time to start charging (see Scheduled Charging and Scheduled Departure).
- Supercharging: Displays supercharger usage fees, the location, the time that charging started, and a cost estimate for the session (see Supercharger Usage Fees and Idle Fees).
NOTE: To reduce congestion at high-usage supercharger sites, you may be limited to a maximum charge of 80% when not using Trip Planner (if available in your market region). See Trip Planner).

