Tesla Model Y: Moving Second Row Seats (7-seater only)
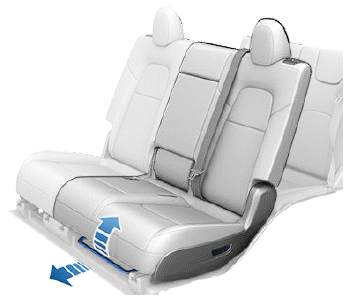
Lift the bar located beneath each outboard seating position to unlock and move the second row seats forward or rearward. The bench seats have a 60/40 split. Therefore, the bar on the left side moves the seat for the left and center seats, whereas the bar on the right side moves only the rightmost seat. Pull up and hold the bar while moving the seat forward or rearward. Release the lever when the seat is at the desired location. Push the seat rearward and forward to ensure the seat(s) are locked into position.
Accessing Third Row Seats (7-seater only)
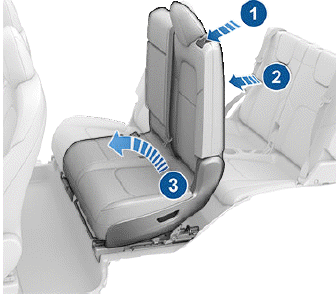
A third row ingress button is located on the backrest of each second row outside seat. This button makes it easy for passengers to access the third row seating positions. To access a third row seat:
1. Press the button on the associated second row backrest.
NOTE: If you press the button and do not move the seats, the seats relock.
2. Push the second row backrest forward. The seat then releases and pitches upward.
3. Push the seat fully forward.
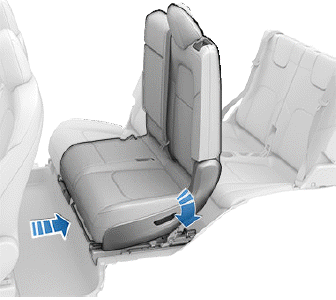
To relock the seats, first push the seat rearward. You will hear the seat tracks lock. Then push the seat downward to engage the rear latches onto the floor strikes. You will hear the latches lock. If the seat does not latch onto the floor, the touchscreen displays a warning indicating that the seat is not properly locked into position.
WARNING: Do not use the button when a child is seated in a seat that will move. Using the button moves the combined left and center seats forward and can squeeze the occupant. Use this button only when the second row seat is unoccupied. Before driving, ensure the seat and the seat back are securely latched into position.
WARNING: Do not use a second row seating position when the seat is not securely latched into position.
WARNING: After using the button to access the third row, push the second row seat backs into their upright position, ensuring that the seat backs are securely latched and "clicked" into position by trying to move them forward and rearward. Failure to do so increases the risk of injury.
WARNING: Keep the area on the underside of the second row seats free of debris to ensure reliable locking of the floor latches.
WARNING: If an occupant is seated in the the third row when pushing down on the second row seat to engage the floor latches, ensure that the occupant's feet are not located under the second row seat.
READ NEXT:
 Folding Third Row Seat Backs (7-seater only)
To fold a third row seat, first ensure that the head support is fully down as
shown (see Head Supports). Then press the button located in the top corner of
the seat back and fold the backrest downwa
Head Supports
The front seats include integrated head supports that you can not adjust.
The second row outboard seats include an adjustable head support that you can
raise, lower, or remove. When either of these s
Removing/Installing a Head Support
All head supports in the second and third
row (if equipped) seating positions can be removed. To remove a head support:
1. Fully raise the head support by pulling
it upward.
2. Press and hold the bu
SEE MORE:
Limitations and Inaccuracies
Lane Assist features cannot always detect lane markings
and you may experience unnecessary or invalid warnings
in these situations:
Visibility is poor and lane markings are not clearly
visible (due to heavy rain, snow, fog, etc.). The exact
detection zone of the ultrasonic sensors varies
d
Map Overview
The touchscreen displays a map at all times (except
when Model Y is shifted into Reverse).
Use your finger(s) to interact with the map:
To move the map in any direction, hold and drag a
finger.
To rotate the map in any direction, hold and turn two
fingers.
To zoom the map in or out, expand
